
DIY Vertical Gardening With Wallgarden: A Step By Step Guide.
There is nothing I love more than when a customer of Vertical Gardens Direct gets in contact to tell me how much they love their new vertical garden - in fact, it is my favourite part of being a small business owner.
Over the years I have also truly enjoyed meeting the many people who have expressed their creativity by creating a beautiful, living piece of art that they can be proud of, and enjoy watching grow over the years to come.
Recently, Scott and Aisha got in touch to tell me how much they loved their new green wall. They also sent in some photos from the build process, and I thought it would be a great opportunity to lay out the steps they went through to create their masterpiece.
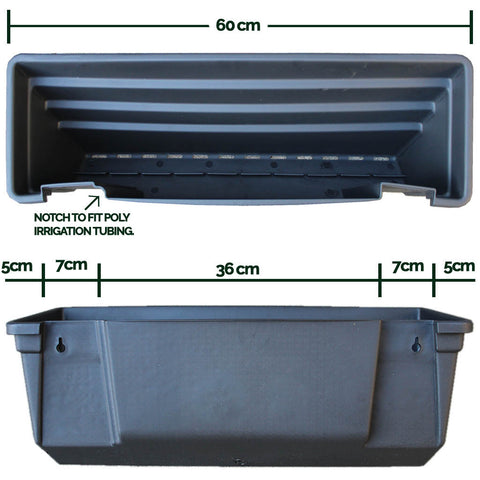
Scott and Aisha built their beautiful new vertical garden using the very simple Wallgarden Vertical Planter Kit. My favourite thing about this kit is the extra large pot size which is where most other vertical planting kits on the market are lacking. Each pot measures a whopping 600mm x 220mm x 200mm and has a capacity of 16.3 litres, which is 5.4 litres of soil per plant (if using 3 plants per pot). This capacity ensures maximum water retention and plant growth whilst avoiding root-rot which is essential if you want your green wall to thrive for many years to come.
Step 1: Building the frame.
Scott and Aisha could have made the choice to simply attach their Wallgarden Vertical Planters directly on to their fence with screws, but because they wanted their new vertical garden to be perfectly in line with the edge of their deck and pergola, they decided to build a timber frame along the edge of the deck, attached to the pergola posts.


Building a frame is recommended if you do not already have an existing surface to attach the pots onto, or if the surface of your existing wall is uneven or flimsy.
Using treated pine, Scott and Aisha built a simple timber frame with the vertical battens spaced apart to fit the Wallgarden pots (see batten spacing diagram image below).
They also painted the frame with a dark coloured outdoor paint which helps to preserve the timber and keep it out of sight once the pots are attached.
Keep in mind that depending on your situation, you may not need to construct a frame like this unless you do not already have a pre-existing wall or fence to screw the pots on to.
Step 2: Attach the pots.
Attaching the Wallgarden pots to the frame is as simple as screwing through the holes at the rear of the planters directly into the vertical timber battens of the frame (or directly into the fence or wall if you have decided not to build a frame).


Attach the pots one above the other until you have reached the desired height of your green wall.
Tip: Use a spirit level to make sure each planter is attached perfectly level.
Step 3: Install Irrigation (optional)
Like most DIY vertical gardeners, Scott and Aisha decided to set up a self-watering system to keep their new green wall as maintenance-free as possible. We recommend doing the same.
Installing water drippers along every third row of pots will ensure that the water cascades from the top row of pots down to the pots below and that all plants receive an adequate amount of water.
This is as simple as running poly irrigation tubing from the nearest tap to your new green wall. Feed the poly tubing up through the channel at the rear of the Wallgarden planters and horizontally along every third row of pots. Drippers can be installed on the poly tubing (2-3 drippers per pot is adequate).


To make things even easier, install a tap timer and program the system to automatically water once or twice per day.

Irrigation kits, as well as poly tubing, drippers and tap timers, can all be purchased from any quality hardware store.
Step 4: Planting (The Fun Part!)
This is where your creativity will really shine! Planting out your new green wall is the most enjoyable part of the process and where your hard work and planning pay off. Decide whether you want to grow edible plants like herbs and vegetables or create a purely decorative (non-edible) green wall. Make sure to do your research and select plants that are suitable for the climate in your region, and for the direction that the wall will be facing. If you aren't especially green-thumbed, just ask the staff at your local nursery for assistance as they will know the climate of the local area and assist in choosing the best plants for the conditions of your green wall.
Ensure you use a high-quality potting mix containing slow-release nutrients and water retention crystals. Once again, if you aren't especially skilled in the garden, just ask for assistance at your local nursery.
We recommend a maximum of 3 separate plants per individual pot to allow for maximum root space and growth for each plant.
Hint: Get creative with the plant layout, and group together different shades and colours of plants to create natural patterns in your green wall. Your local nursery will be more than happy to help with the selection.


Maintenance
If you have installed a self-watering irrigation system, then maintenance of your new green wall will be minimal.
Make sure to check for Aphids and other plant-eating insects periodically and treat if needed with a natural pest remover.
Within a few months of growth, the Wallgarden pots will disappear behind a wall of beautiful greenery and you, your family, and friends will marvel at the magnificence of your new living piece of art!